HomeHomeHomeHome

Monday, November 28, 2011

And Sprinkles Makes...

Embroidery inspired cake! I found this great idea on Pinterest and thought it would make a great anniversary cake for my mom and step-dad. I found the design on this wonderful blog, Polka & Bloom. I enlarged the design I liked- which she calls the Spring Bird and I call 'The Love Birds'. I printed on a colored printer, and just followed the patter by looking back and forth. I loved making this for them. I went with colored cake on the inside, green, yellow and pink layered. It was as fun making it, as it was eating it on Thanksgiving night.

- I found great sprinkles in several colors at Michael's Crafts.


- And a lot of white frosting. I cheated and used store bought fluffy white frosting. I put the cake in the refrigerator for about an hour prior to decorating, to have it soft enough to have the sprinkles stick, but hard enough so it was easy to work with.


- I used tweezers (new!) to place each sprinkle on, while looking back at the large print out I did on a colored printer of the pattern. I did use the tip of the tweezers a few times to trace out a pattern to follow.


- And some love. I added some pine from outside of my house to give it a more festive look and texture.


I did not win our Thanksgiving Day contest for best dessert, but I feel like I sure did 'take the cake'.

Sprinkles anyone?

I hope everyone had a wonderful Thanksgiving holiday- I know I am very thankful for the wonderful family and friends I have- and enjoyed a long, yet, busy weekend! I wanted to give a sneak peak at my Thanksgiving/Anniversary cake I made for my mom and step dad. Needless to say, it took a few hours, but was worth it...

Thursday, November 17, 2011

All Stitched Up- My Favorite States

I am a member of the Junior League of Portland- and we have something called DID 'Done In A Day', which, you guessed it, is a project you can do in a day. So, in the spirit of the league, I decide to tackle this project I Pinned a while back. I have done needlepoint since I was little, so this was not super difficult for me, but even if you don't have a lot of experience in stitching, this should not be too hard. I am planning on framing all four in matching frames, and hanging 2 over 2 in my bedroom along with the other wall art I have been working on- see here.

So here is how I did this fun 'DID'!

1. I printed maps of the states Matt and I have lived in (Maine, Vermont, New Hampshire and myself in Washington, I did not do Colorado where Matt has lived, but I will) . I basically just searched for each state in Google and went to 'images' and found them, and printed. The only negative was that they are not completely in proportion. I had a new-ish white pillow case and traced with pencil each outline of the state. I had thread, but it is the same stuff you use to make friendship bracelets, or typical needlepoint projects :)


2. Since I needlepoint, I had a wooden ring which helps keep fabric taut. I don't think you need one though, but it helps. I just started a simple stitch along the pencil trace. I did a free hand heart (in red, duh) close to the places we have lived. Matt grew up outside of Montpelier and I lived in Burlington and Stowe, Vermont.


3. The state of Maine has the longest coast line out of any other US state, just sayin'! I did not get too elaborate, but did the best I could. There are a lot of nooks and crannies in Maine, but I think it came out pretty good. We live in Kennebunk, which is very very south (hence the heart!)


4. Matt lived in New Hampshire for over 10 years in Portsmouth, and I went to college in New London. I decided to keep it simple with on heart on each state, so his trumped mine :)


5. I loved living in Seattle, so here is my homage to that beautiful state!


6. Here is all four together. They will look great framed on my wall, and love the meaning they have to Matt and I.


I would love to see if anyone else does other states :) I can imagine Colorado will be easy!

Wednesday, November 16, 2011

Need Another Unique Wedding Gift Idea- Look No Further!

Matt and I recieved an amazing wedding gift from his brother, Erich and girlfriend Angela. He is an amazing wood craftsman! They refurbished this old trunk they found at a market. They did an amazing job with the details. The fabric on the inside is all brand new, along with the hand-crafted shelving and storage. My favorite part was how they filled it with really fun things, on every layer! From UNO cards to wine, they did an amazing job. It was like opening a beautiful stocking on Christmas morning. Thank you Erich and Angela, we totally owe you :)


Just a taste of what they filled it with:

- Paper umbrellas for our cocktails
- UNO cards
- Crayons
- WINE!
- Crainum (best game ever)
- Fabric and other fun sewing accouterments for my sewing
- Water guns - because you just never know
- Pink plastic Flamingo - we named Lester and he made an appearance at the beach for our wedding
- Animal crackers
- Maple candy- Matt's favorite
- Maple cookies- another one of Matt's favorite
- Rug
- Match box cars
- Model John Deere Tractor
- Bird stickers (love)
- Easy button
- Bag Balm
- GI Joes
- Candles
- Puzzle
- And much more...Amazing!

Sunday, November 13, 2011

Volume 1


How many times have you been browsing Pinterest, looking through a magazine, seeing some commercial at 3 AM etc. etc., and think, Why Didn't I Think of That? Well, this is the post for you. I think every Sunday I am going to do a re-cap of the best 3 ideas I have seen, and cannot take any credit for! Awesome props for those who have come up with these, I love them, and will try to replicate! I of course will attribute all the credit back to the original thinker!

1. Good Excuse for Buying Chips
All you need is a can of Pringles, gift wrap and some homemade cookies. Just wrap the container, add in your cookies (I would use a small cutter to make sure they fit) and add some ribbon! I am totally going to do this for the holidays- but would also be cute for favors or hostess gift. Thanks to a friend for Pinning, and to A Thousand Words for the idea!


2. Wine Stopper
I love the idea of using old glass or other kind of knob/pull you either have around, or buy. My husband thinks all you need is a rubber stopper from the hardware store, and some good Gorilla glue should do it. Unfortunately, I Pinned this from a friend, and cannot find the original source.


3. A Real WDITOT Moment For Me

I love hanging things, I have had a little boxwood wreath in my kitchen hanging from the window forever! This is a great idea, you can hang wreath from your cabinet, little vintage sign, dried herbs...anything you want! Love it Lemonade.


If you have any great ideas, please share!

Monday, November 7, 2011

Cheap- Easy- Authentic Wall Art

I have struggled for years on how to dress a wall (especially a bedroom) without it looking overdone, generic and having it still relfect 'me'.

As I posted in my first Pinterest Challenge here I decided to hand paint one of my master bedroom walls- and I love how it came out. Now my next challenge was 'dressing' it with just the right art. I decided to do something I had tried, and failed at in the past. The multi-sized, multi-print (photos, print,fabric etc.) frames.

I hate to go out and buy new frames from Target or Pottery Barn ($$) and I did not have a ton that I felt all went together, so I decided to take what I had, and go on a hunt to buy. Naturally, I went to the Goodwill (second hand super center in New England) to buy old frames. I ended up spending $11 total on new frames, and spray painted them all gold. Here is how I did it:


1. Trip down memory lane (from 2 weeks ago!) This is what I mean by art that that does nothing for the room it is in. Although I love the piece, and it is actually a painting of Kennebunk River which is down the street, it was to to to blue blue blue.


2. Getting there...


3. All done with the hand painted stencil. (NOTE: I am still getting use to this camera, and it is amazing what a flash/no flash, lighting can do) Apologizes in advance. This portrays the real color of the wall the best.


4. Like I said, I found several cheap frames at Goodwill. The one Matt is removing the staples from was 99 cents!! Even if you find a nice frame and the back is capped off with paper (like a real custom joby) you can still remove the paper, and staples like we did.


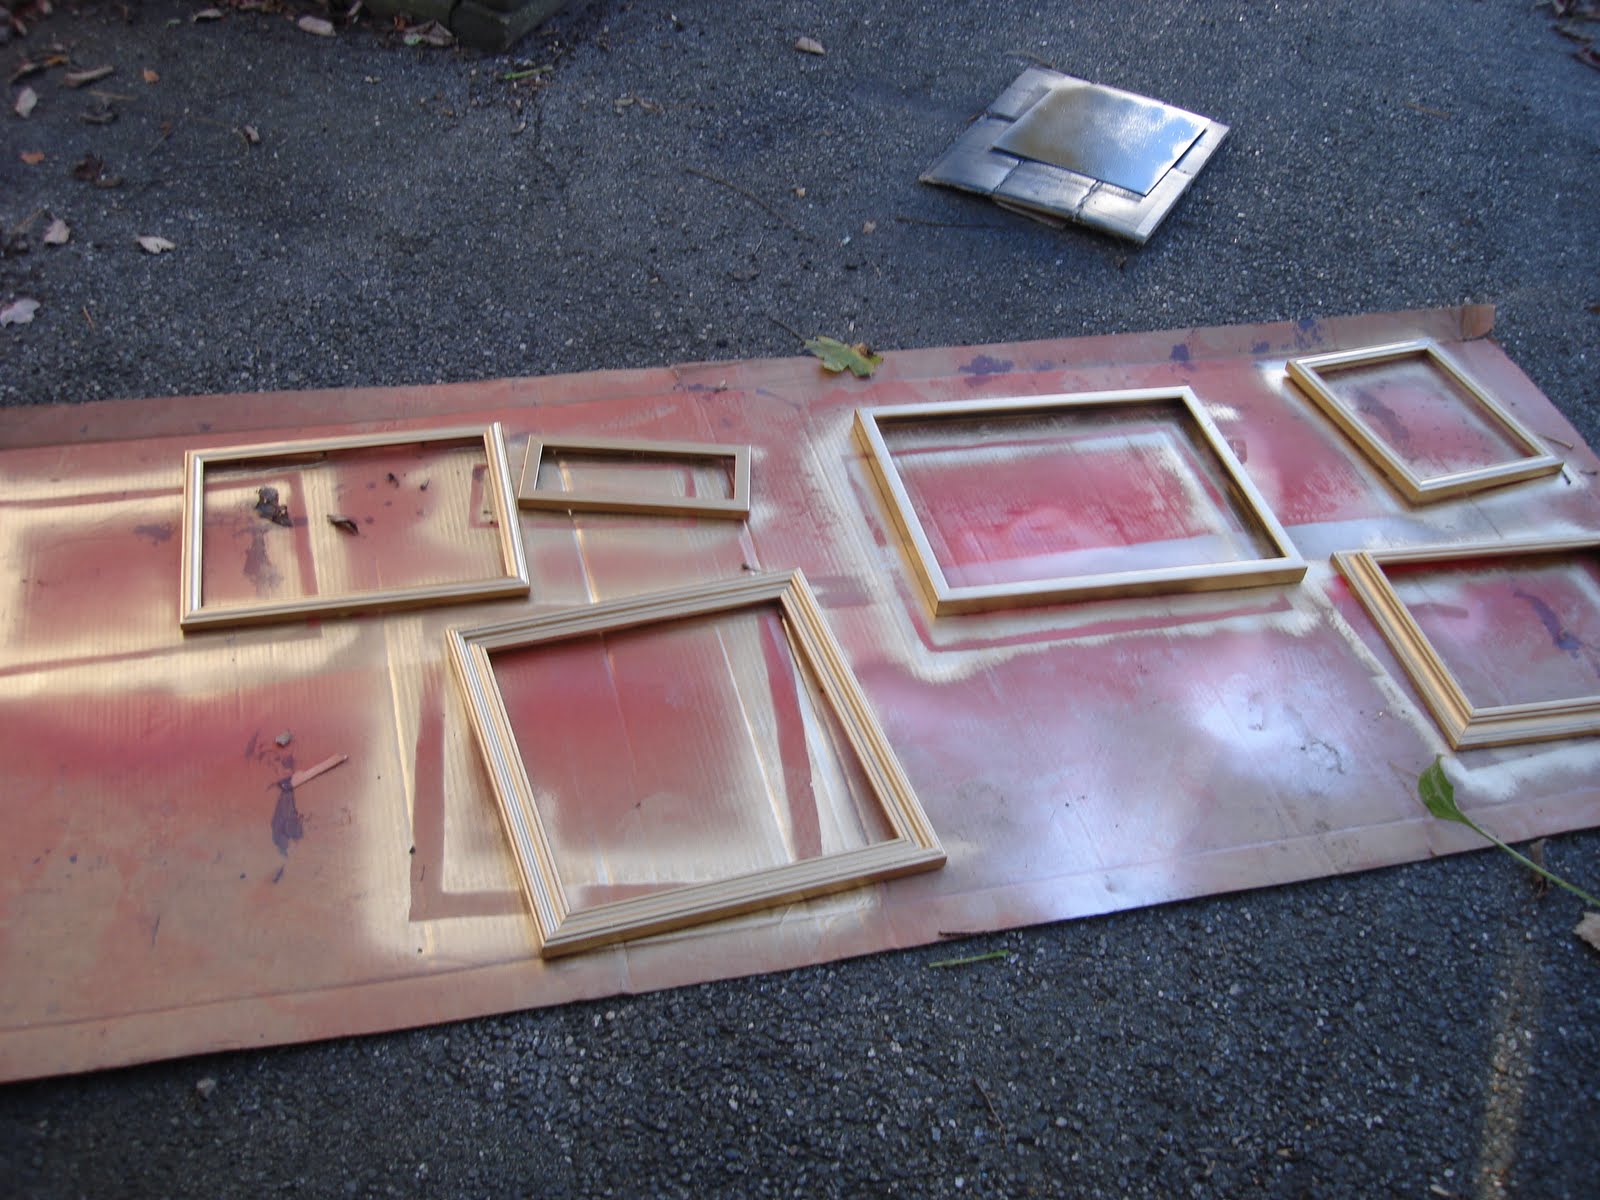
5. So once I removed all of the backs and glass, I spray painted all of the frames with gold metallic spray paint ($4.99 at Ace Hardware). NOTE: It was border line too cold out (about 50 degrees F) and some of the frames were metal, so they took several coast of paint. But they came out pretty good, if I do say so myself :)


6. While at Ace Hardware, I also saw black chalkboard spray paint. I figured I could do something with it. So, I painted one of the pieces of glass from the purchased frames so I could have a little chalkboard in my room! I did about 5 coats of paint, and let dry overnight before I framed again.

Progress:


End Result: All I have to do is get some nice white chalk and write whatever I want. I am thinking 'I heart Maine' - but might change my mind.


7. Another one of the frames I bought had no real backing. Ironically I had a pizza box in the barn (I could eat pizza all day- which is not good- at all) so I cut it as the same size of the glass using an EXACTO knife (there appears to be several different ways to spell that). Since I knew I did not have an actual picture, or anything I wanted to frame that size- I decided to do a homemade mat. All you have to do is cut a 4x6 (or whatever size picture you want) box out of the middle of cardboard.


8. Instead of a solid color, I wrapped the mat in some yellow and white honey comb fabric I already had. Just make an 'X' in the middle for the picture, and wrap the entire mat like a present. NOTE: I totally should have ironed the fabric...although once framed, you can hardly notice.

Progress:


End Result: I found a great wedding photo and framed it. I love the contrast of the blue, yellow and gold- and the different texture of patterns looks really subtle- and great!


9. I love how these are turning out. I added two white frames I had in the attic, and will spray paint this weekend. I especially love that there is a mix of texture and mediums throughout.

- A favorite map of mine of Kennebunk
- One of Matt and I first photos at Old Orchard Beach photo booth with horizontal striped fabric as backing
- Framed print of elephant which Matt and I fell in love with
- Coral color fabric as backing, with two more wedding photos
- Two white frames are TBD, but currently have post cards from Seattle where I use to live


Although not complete, I really like how it is turning out. More to come!


Sunday, November 6, 2011

Caning- Not Candy.. Chair

My husband made probably made my favorite refurb ever- a hand caned chair. He found this old, previously loved free chair on the side of the road with no seat. He ended up falling in love with the project, and it came out beautiful. So if you have a caning project, let us know. Matt loves them, and is going to be working on another one this winter and I will be sure to post!

Here are a few pictures, I WISH so badly we had a before pic. It was originally painted black- but was basically all chipped off. It had no seat, although was previously caned, so the holes were already there.


I think my two favorite parts are the gold monogram he did on the chair with custom made gold stickers, and the note he wrote to my mom, tied with red ribbon on a vintage looking tag. She liked it so much, the tag is still on the chair :)

Paperwhite Season is Upon Us!

Paperwhite season is here. I think so anyways! I think anytime after Halloween until Easter can pass for paperwhite season...although I have a hard time finding them after February.

Anyways- there are so many different ways to do paperwhites. My mom always does glass container with white little rocks, I usually do soil, with glass or white containers, and add a bit of moss on the top. If you do glass and soil together, the roots can look really cool once they begin to grow!

I did a few paperwhites today- and will post again when there is progress. NOTE: Rumor is that if you add a little vodka after about 2 weeks they will not grow as tall. This can be a problem because if they get too tall, they fall over. I usually do a little ribbon to tie them together, which also helps. Here is how I did them today:

1. I grabbed some soil from my garden. I found these white containers at different markets, both under $5


2. As I mentioned, my mom always does paperwhites too, so she brought me over my first batch of the season!


3. Just place on top of soil, so just about half of the bulb is showing.


4. Water for about 10 seconds, and wait patiently! They should start to sprout in about 5 days, with beautiful, and VERY fragrant white blooms in about 2 weeks!

Thursday, November 3, 2011

Pinterest Challenge! Better Late than Never


I may be a bit late on this, but I did want to submit to the Pinterest Challenge I read about from Young House Love (can you tell I love that blog or what). So, I posted a sneak peak to my very big job I was starting in our master bedroom...and here are my end results. I pinned this in my mind a long time ago, and found the official pin from Jones Design Company.

What I used:
- Left over white paint from a kitchen project
- About 1/2 cheap ($2.49) paint brush from Michael's Crafts
- Cardboard from a shoe box for the pattern- which I printed from
Jones Design Company.
- Pencil
- A lot of time (I think about 4-5 hours to stencil, and 5+ to paint)

All I did was take the stencil from Jones Design Company, trace it on to cardboard and cut out for my stencil. I should have started in the corner, but for some reason I started in the middle (don't do that) start at the corner. Just being to trace and trace, moving the stencil down as you go, and repeat, and repeat!

For the painting, I just painted over the pencil lines, sloooowly. There are for sure places where I messed up (big time) but that is OK, it gives it character and I like that.

Before


Progress


More Progress


Almost there


Yeah! Now just have to focus on wall art


Totally love my new textured wall- and it cost $13 total, and A LOT of time- but well worth it!

Wednesday, November 2, 2011

Big Job, Big Ambition- Stay Tuned!

So Matt said this looked like the biggest project I have taken on to date (by myself)...I told him, just support it, and it will come out fine. So, like a good husband, he helped guide me on my way to stenciling bliss! I found this awesome idea on another wonderful blog here by Jones Design Company.

This is just the beginning my friends...

Before: I love the color of my bedroom walls, it is a light sky blue. But the wall art is too blue with it, and I want more of a patter and texture to the room.


Matt helping me get the stenciling going. I messed up a bit, but kept plugging away.


I am going to continue to stencil the rest of the wall, then paint white. Hopefully the finishing project will look something like this from Jones Design Company, if I am lucky!


Stay tuned...

Before & After- Bathroom

Although we liked our half bath off of our kitchen when we moved in, we felt it needed a little 'something'. I looked in my favorite wallpaper books by Thibaut - and could not quite find the look I was going for. I later found an amazing post on one of my favorite blogs, Young House Love- and wahh laaa, found it (see it here)!

So, on one of the hottest, most beautiful summer days (I have no idea why) Matt and I decided to take a wack at it, and here is how it came out.

Before: Basic, new toilet, nice new floors (can't complain there) and new basic sink and console.


Before: Again, nice new sink. We thought of doing an antique pedestal sink but that was more than we wanted to bite off for a weekend.


Before: Looking in from hallway/laundry room.


And our After!

Looking in from the hallway- you can see the nice big painted stripes!


After: My mom found these great maps (we love maps) at a flea market ($5!!) of our beloved town. Matt bought these black frames from Michaels for $20 a piece!

Painting the walls was- errr, difficult, but not impossible. We did a fresh coat of white paint, then measured out 10 inches and penciled out the stripes. Then we just painted in the darker of the two with narrow paint rollers. NOTE: the painters tape will only work when the walls are completely dry.


After: Another black frame with a write up about our town found at the same flea market as above piece. We bought a new hand towel holder to match the new switch plates and knobs to match!


After: We decided to paint the sink console white, and added bead board to the one showing side. This helped differentiate it a bit. We added matching knobs as the rest of to give it more of a refined feel.


I always think less is more (it took me a while to come to this conclusion). To keep it simple, I added a new bottle of really great soap from Molton Brown. Also, instead of bolting a toilet paper holder on to my new bead board, I found a matching stand alone toilet paper holder, which goes great in the corner. Add a matching waste basket, and we were DONE!